Hand building Ceramics at Home: A Beginners Guide Part 2
- Leah<3

- Jun 4, 2024
- 10 min read
Hand building is one of the oldest and most accessible methods of creating ceramic pieces. Unlike wheel throwing, hand building techniques allow for more flexibility and creativity, making it an ideal starting point for beginners working from home. This guide will provide you with an introduction to the essential techniques and tools needed to start your journey in hand building ceramics. If you're not already coming from my previous blog post Ceramics At Home : A Beginners Guide It is essential that you go read it. I provide all at home set up information and very important health and safety precautions you must take. In my last post I also go over needed materials and link items you will need!

Selecting A Clay Body
As a beginner ceramicist, selecting the right type of clay is crucial to ensure a smooth and enjoyable learning experience. Here are some clay types that you will hear of:
1. Earthenware Clay
Characteristics
Earthenware is a low-fire clay, typically fired at temperatures between 1,800°F and 2,100°F (982°C to 1,149°C). It is relatively soft and easy to work with, making it ideal for hand building and wheel throwing.
Advantages
- Fires at lower temperatures, reducing energy costs.
- Available in various colours, including red, buff, and white.
- Glazes adhere well to earthenware, offering a range of decorative possibilities.
Best For
Small decorative items, tiles, and functional ware like planters and bowls.
2. Stoneware Clay
Characteristics Stoneware is a mid to high-fire clay, typically fired at temperatures between 2,100°F and 2,400°F (1,149°C to 1,316°C). It is more durable and less porous than earthenware.
Advantages
- Strong and durable, suitable for functional pieces.
- Less prone to cracking and warping during drying and firing. - Available in a variety of textures and colours.
Best For
Functional pottery such as mugs, bowls, and plates, as well as larger sculptures.
3. Porcelain Clay
Characteristics
Porcelain is a high-fire clay, typically fired at temperatures between 2,300°F and 2,500°F (1,260°C to 1,371°C). It is known for its fine, smooth texture and white colour.
Advantages
- Extremely smooth and capable of taking fine details.
- Translucent when thin, allowing for delicate and elegant pieces.
Challenges
- More difficult to work with due to its fine particle size and tendency to slump.
- Requires higher firing temperatures.
Best For
Experienced ceramicists, but beginners can try it for small, detailed pieces once they are comfortable with other clays.
Recommendations for Beginners
1. White Earthenware Clay
- Easy to manipulate and forgiving during the learning process.
- Works well for hand building and beginner wheel throwing.
- Provides a bright surface for colourful glazes and decorations.
2. Stoneware Clay
- Slightly more durable than earthenware.
- Versatile for a range of projects from functional ware to sculptural pieces.
- Handles well on the wheel and during hand building.
3. Low-Fire White Clay
- A type of earthenware that combines ease of use with a smooth texture.
- Ideal for those interested in creating brightly glazed pottery.
Purchasing Clay
- Be sure to purchase from Reputable Suppliers to get consistent quality. A great place to start is Tuckers Pottery Supplies or Pottery Supply House. They are great, reliable and well known!
- Experiment with different types of clay to understand their properties and find what works best for you.
- Understand Clay Preparation. Learn to wedge your clay properly and if using freshly pugged clay without wedging be sure not to trap any air bubbles while building. Refer back to my last blog post for the ceramic vocabulary list to understand what pugging and wedging is.
Starting with these beginner-friendly clays will help you build foundational skills and enjoy the process of creating your first ceramic pieces. As you gain experience, you can explore other types of clay and more advanced techniques but its important to start small and build your knowledge from there.
❗️Remember to buy your materials according to the firings at the studio you are bringing your items too. Don't be afraid to call them and ask which kind of clay you should buy, they may even be able to supply some for you!❗️ Again, go read my last blog post for more info on how to get your items fired.
Pinch and Coiling / Slab Building
Get your materials ready for this stage!
Quick Links:
⭐️Slab Mat
⭐️Calipers
(More information and links on supplies in my last blog. From the table of contents, click the materials section!)
Pinch and Coiling
The pinch and coil technique involves shaping a lump of clay by pinching it between your fingers and thumb. This method is one of the oldest and simplest ways to form clay into various shapes, typically starting with a small ball of clay and manipulating it into a pot, bowl, or other forms.
Step by step guide:
1. Start with having an idea of what you are going to make. wether its a large bowl, mug, plate, vase, etc. Make sure you are using well wedged or freshly pugged clay.
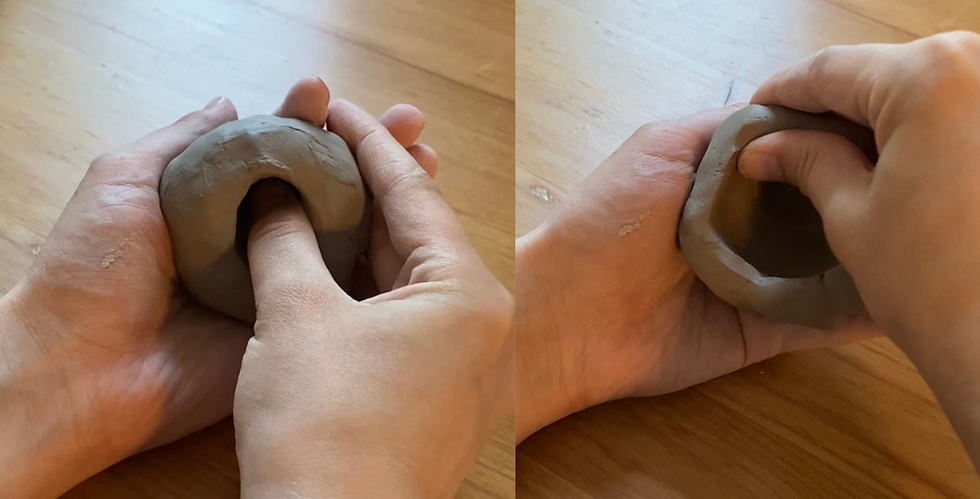
2. Using your hands, form this clay into a ball. With your thumb, press down into the centre of the ball creating a well. From here, keeping your thumb on the inside of the ball and with your fingers around the outside, begin to pinch the clay between your fingers and thumb to pull it out into a wider bowl like shape. The larger the item you are making the larger and more flat you will pinch out your base to be. If you are making a small cup or bowl then once you start pinching start out taller and smaller rather than flat and pulled out.
3. From here you will need to start making coils, to do this just grab some more freshly pugged or wedged clay and start to roll it out into a log. I recommend rolling it out on your table and be sure to add even pressure and move your hand along the entire coil when rolling to get as even of a coil as you can. Your pinched clay base should be around 1/4-1/2 inch thick, it should not be more than 1 inch thick! Your coils should match the thickness of your walls or be slightly thicker.
4. From here you will start to build your walls up. Simply place your coil along the edge of your pinched base and smudge the clay base and coil together.

5. As you build you will need to stop and let your clay dry out a bit to get around soft to medium leather hard (refer to my last blog post for clarity on this vocabulary!). If you do not do this, the clay will be too soft and wet, the taller you go it will eventually flop all over the place. It is important to note that once you start adding your coils to the leather hard clay, you should be scratching and slipping your coils on with slip and then blending the clay together. If you do not scratch and slip at this point, once your piece begins to dry you will get cracking where the joins are and parts of your coils could completely crack off.
6. Scratch and slip: Scratch and slip is when you distress the surface of the clay by scraping it in a cross hatching motion, you can use a pin tool to do this which comes in this kit. You must scratch both ends of the surfaces you are connecting, so both the rim of your pinch and coil pot as well as the coil you are attaching! After scratching you will paint on slip to each piece of clay, and then press them together to attach, smoothing out and pressing together the coils. Slip is basically just watered down clay, to make this you will take bone dry clay, break it up into small pieces (avoid dust!) and then simply soak in water and mix together until you get a yogurt like consistency, then the slip is ready to use. The scratches create a rough texture that helps the slip penetrate and bond the pieces more securely.

7. If you are building something large it is important to have the portion of your work that you have already made covered! This will slow down the drying time and keep the clay at a similar moisture level which is very important to avoid cracking. For example, if you are making a large pot and are already half way up your height, just cover the bottom portion of what you've made with a plastic bag. If you find that it is drying out too fast you can just spritz it with some water! It is also important to note that if you want to take a break and work more on your piece later, you must FULLY wrap your work up or else it will dry out! To keep your work at a leather hard state, simply wrap it up using some more plastic bags and spritz with water as needed if it is drying too quick.
8. Once you finish your build it is important to go back and clean up. My favourite thing to use for cleaning up on leather hard clay is a Rubber Rib. Metal or wooden ribs will also work great! A rib is a flattened surface with a rounded edge, some having more angular and sharper edges as well, this type of tool is really good for smoothing and compressing the clay during clean up! You can find both the metal and wooden ribs in this tool kit, the rubber ribs are not included in this kit but i've linked them here too. To ensure the bottom of your piece is flat, you can wet a wooden bat with some water and then move your piece on top of it in a figure eight motion to sort of sand down the bottom of your work. Do this with hard leather hard clay.
9. If you are adding a handle or any other external clay pieces onto your work it is important that both the handle and body of work be at the same moisture level, this will prevent cracking and set you up for success with having a strong seamless join. Making sure both your work and handle are the same level of leather hard, scratch and slip both pieces onto each other. Once attached by scratching and slipping, you can add a small coil around each end of the handle where the join is and blend it in to strengthen and reinforce the handle.
10. When drying your work to bone dry to prepare for bisque firing, lightly drape a piece of plastic over your work, still allowing it to get airflow. This will slow down the drying time and reduce the risk of cracking, allowing for an even dry.
Slab Building
Slab building is a versatile and fundamental technique in ceramics, perfect for creating geometric forms, large flat surfaces, and detailed texture work. It involves rolling out flat pieces of clay (slabs) and then cutting, shaping, and assembling them into various forms.
Step by step guide:
1. Have your idea planned out, you can prep by having sketches and templates to use when cutting out your clay.
2. Start by rolling out a slab using freshly pugged or wedged clay. Do this using a rolling pin and the Roller guide sticks to get your desired thickness. While rolling out, do this on top of a canvas bat or this Slab Mat, if you don't it will stick to your table.
3. Once you've rolled out your slab, take either a Rubber Rib or a metal rib (found in this kit) and press it along your slab to compress it, compressing it strengthens the clay, this will help to avoid cracking and to help keep your pieces flat when drying and firing as warping is a common problem. Clay has a 'memory' meaning if you are bending it and then decide to flatten it out, it will not stay flat, it will most likely start to curve when drying and more when fired. To avoid this, keep it as flat as possible, compress it with a rib, and let it dry between two slab boards, the weight of the boards will help compress the clay particles even more.
4. It is important to wait until your slabs are at least soft-medium leather hard to work with them, if they are too soft they will stretch and not hold their form as you work with them. After your slabs reach leather hard, you can now cut out your desired pieces and shapes to build your form.
5. When attaching your cut out pieces effective scoring and slipping is essential to having a successful form. Follow the same scoring and slipping instructions above. Once you've scored, slipped, and pressed together your pieces, leave the pieces until the slip has slightly become more firm (this will only take a couple minutes). Once you can see the slip in the corner of the seam is now slightly firmer, smooth it out with a tool that you think will best suit the job, or even just use your finger. Remember that in that tool kit, you have so many different options and resources to use for clean up, texture, decoration, etc so play around with each tool and see what works best for you! You can also use a small coil of clay on the joined seam to reinforce it if you feel this is necessary. A simple brush from this Brush Set will also do the trick for smoothing out slip and hard to reach areas. Supporting your works after joining is also important. Use supports (like foam or crumpled paper) to hold the shape while it dries and firms up.
5. If constructing large forms, using a Banding Wheel is very helpful. While you move around your piece to work on it, too much tension or stress from moving it can cause cracking or cause it to just fall apart. A Banding Wheel gives you the ability to freely spin your work around and get to each side while not having to worry about too much handling making it fall apart.
6. For drying out your work it is the same as described above. If working on a separate section of your piece, cover what you have already attached and built to allow for even drying time. When wanting to take a break or come back another day, cover it FULLY with plastic and spritz with water if it is drying out too much. When finished building, cleaning up, and decorating your piece, lightly cover it with plastic to still allow for airflow to let it slowly reach bone dry. When letting it reach bone dry, put emphasis on covering the thinner areas of your work as they will dry first compared to the larger sections, this uneven drying will commonly cause cracking.
Slab building is an accessible and versatile technique in ceramics that allows for a wide range of creative possibilities. Whether you are making functional items like boxes and planters or exploring artistic textures and forms, slab building offers a solid foundation for your ceramic practice. With patience and practice, you can create beautiful and structurally sound ceramic pieces. Enjoy the process and let your creativity guide you!
For more information on glazing and firing your works please refer to my last blog post as we go over this there! I will also be making another post in the future talking about different surface design techniques during the greenware and also bisque stage so stay tuned for that! Sign up for email notifications to be the first to hear:)


Comments